Angular Upload File to Api Byte Array
Sometimes yous need to upload files to your server from an Athwart application to a Web API method. There are many means to upload a file. In this article, I'thou going to present a method that works well for small files, up to about one or two megabytes in size. Y'all're going to build ii projects; a .NET Cadre Web API project and an Angular project. You lot'll build these ii projects from scratch using the Angular CLI, .Internet Core, and the Visual Studio Code editor.
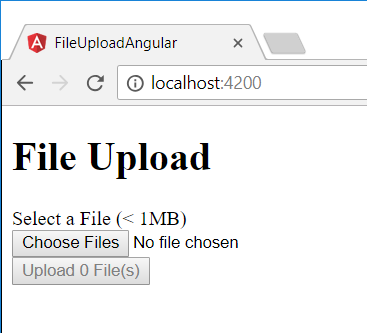
The effect from this article is a page (as shown in Figure 1) that allows you to select one or more than small files using an <input blazon="file"> element. You lot then build a custom FileToUpload object with attributes about the file, plus the file contents. Finally, this FileToUpload object is sent via a Web API phone call to a method on the server. In one case the server has this file, you may choose to salve it as a file on the server, into a database tabular array, or any other location.
Build a .NET Core Web API
Let's start by building the .NET Core Spider web API application to which you upload files. Open up an instance of Visual Studio Code. From the menu, select View > Final to display a concluding window at the bottom of the editor. You lot should see something that looks like this:
Windows PowerShell Copyright (C) Microsoft Corporation. All rights reserved. Xx C:\Users\YOUR_LOGIN> I'1000 certain you lot have a directory somewhere on your hard drive in which you create your projects. Navigate to that folder from within the terminal window. For example, I'm going to go to my D drive and then to the \Samples folder on that drive. Enter the following commands to create a .NET Core Web API project.
d: cd Samples mkdir FileUploadSample cd FileUploadSample mkdir FileUploadWebApi cd FileUploadWebApi dotnet new webapi Open up the Spider web API Folder
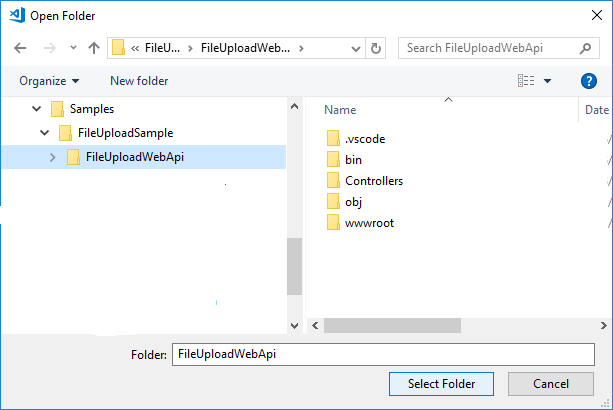
Now that you've built the Web API projection, y'all demand to add information technology to Visual Studio Code. Select File > Open Folder... and open the folder where you lot just created the FileUploadWebApi projection (Effigy 2). In my example, this is from the folder D:\Samples\FileUploadSample\FileUploadWebApi. One time yous've navigated to this folder, click the Select Folder button.
Load Required Assets
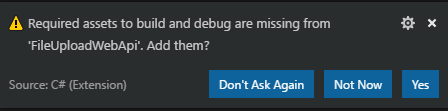
Later loading the folder, VS Code may download and install some packages. Later a few more seconds, you should run into a new prompt announced (Figure 3) in VS Code saying that some required assets are missing. Click on the Yes push button to add together these avails to this projection.
Enable Cors
The Spider web API project is going to run on the accost localhost:5000 by default. Still, when you create a new Athwart application, it will run on localhost:4200 past default. This ways that each Spider web application is running on a separate domain from each other. For your Angular awarding to call the Web API methods, you must tell the Web API that you're allowing Cantankerous-Origin Resources Sharing (CORS). To use CORS, add the Microsoft.AspNetCore.Cors parcel to your project. Go back to the terminal window and type the post-obit command:
dotnet add package Microsoft.AspNetCore.Cors After the package is installed, inform ASP.Cyberspace that y'all're using the services of Cors. Open the Startup.cs file and locate the ConfigureServices() method. Telephone call the AddCors() method on the services object as shown in the post-obit code snippet:
public void ConfigureServices(IServiceCollection services) { services.AddCors(); services.AddMvc().SetCompatibilityVersion(CompatibilityVersion.Version_2_1); } Curl downwardly within the Startup.cs file and locate the Configure() method. Listing i shows you the code to add to permit the Spider web API to accept requests only from localhost:4200. Permit all HTTP methods such as GET, PUT, etc., past calling the method named AllowAnyMethod(). Allow any HTTP headers within the Web API call by invoking the method AllowAnyHeader(). Call the app.UseCors() method prior to calling the app.UseMvc() method.
Listing 1: Phone call UseCors() from the Configure() method in the Startup.cs file.
public void Configure(IApplicationBuilder app, IHostingEnvironment env) { if (env.IsDevelopment()) { app.UseDeveloperExceptionPage(); } else { app.UseHsts(); } app.UseCors(options => options.WithOrigins("http://localhost:4200").AllowAnyMethod().AllowAnyHeader()); app.UseHttpsRedirection(); app.UseMvc(); } Try It Out
It'southward a good idea to test out your Web API project and ensure that it accepts requests as expected. Select Debug > Kickoff Debugging from the Code carte du jour to build the .NET Core Web API project and launch a browser. The browser will come up up with a blank page. Type the following into the browser accost bar:
http://localhost:5000/api/values Press the Enter key to submit the request and yous should see a string that looks like the following:
["value1","value2"] Add together a FileToUpload Form
A file you upload from your local hard bulldoze has attributes that you lot should transmit to the Spider web service. These attributes are things similar the file name, the file type, the size of the file, etc. You're going to likewise add some boosted properties to hold the file contents as a Base64 encoded string and a byte assortment. Create a \Models binder in the root of your Web API projection. Add together a new file named FileToUpload.cs into this folder. Add the code shown in the following code snippet to this file:
using System; public form FileToUpload { public string FileName { get; set; } public string FileSize { get; ready; } public string FileType { get; set; } public long LastModifiedTime { get; set; } public DateTime LastModifiedDate { go; gear up; } public string FileAsBase64 { get; prepare; } public byte[] FileAsByteArray { get; set up; } } Add a FileUpload Controller
Plainly, you need a controller class to which you lot transport the file. Delete the ValuesController.cs file from the \Controllers folder. Add a file named FileUploadController.cs into the \Controllers folder. Add the code shown below to this file:
using Organization; using Organisation.IO; using Microsoft.AspNetCore.Mvc; [Route("api/[controller]")] public course FileUploadController : Controller { const string FILE_PATH = @"D:\Samples\"; [HttpPost] public IActionResult Post([FromBody]FileToUpload theFile) { return Ok(); } } The above lawmaking creates the road for the FileUploadController, sets upward a constant with the path to a folder on your local hard drive that your Spider web project has permissions to write to, and sets up the Post() method to which you send an object of the type FileToUpload.
Instead of the difficult-coded constant for the file path to write the uploaded file to, you should have advantage of the ASP.NET Cadre configuration system to store the path. For this article, I wanted to keep the lawmaking elementary, and used a constant.
Create a Unique File Name
Get-go creating the lawmaking within the Mail service() method now. Just higher up the return Ok(); line, ascertain a new variable named filePathName. Create the full path and file name to shop the uploaded file into. Use the FILE_PATH constant, followed past the FileName belongings, without the file extension, from the file object uploaded. To provide some uniqueness to the file name, add on the electric current date and time. Remove any characters that aren't valid for a file by using the Replace() method. Finish the file name past adding on the file extension from the file object uploaded.
var filePathName = FILE_PATH + Path.GetFileNameWithoutExtension(theFile.FileName) + "-" + DateTime.Now.ToString().Replace("/", "").Supervene upon(":", "").Replace(" ", "") + Path.GetExtension(theFile.FileName); If yous're going to have multiple users uploading files at the same time, you might as well want to add together a session ID, a GUID, or the user's name to the file proper noun so you won't get any name collisions.
Remove File Blazon
In the Angular lawmaking yous're going to write, y'all're going to exist reading the file from the file system using the FileReader grade. This class is only available on newer browsers. The FileReader grade reads the file from deejay every bit a Base64-encoded string. At the beginning of this Base64-encoded cord is the type of file read from the disk followed past a comma. The rest of the file contents are after the comma. Next is a sample of what the contents of the file uploaded wait like.
"data:image/jpeg;base64,/9j/4AAQSkZJRgABAg..." Write the following code to strip off the file type. Check to ensure that the file type is there and so yous don't get an error by passing a negative number to the Substring() method.
if (theFile.FileAsBase64.Contains(",")) { theFile.FileAsBase64 = theFile.FileAsBase64.Substring(theFile.FileAsBase64.IndexOf(",") + 1); } Convert to Binary
Don't store the file uploaded as a Base64-encoded string. You want the file to be useable on the server just like information technology was on the user's hard drive. Catechumen the file data into a byte array using the FromBase64String() method on the .Internet Convert class. Store the results of calling this method in to the FileAsByteArray property on the FileToUpload object.
theFile.FileAsByteArray = Convert.FromBase64String(theFile.FileAsBase64); Write to a File
Y'all're finally gear up to write the file to disk on your server. Create a new FileStream object and pass the byte assortment to the Write() method of this method. Pass in a zero as the second parameter and the length of the byte assortment equally the third parameter and then the consummate file is written to disk.
using (var fs = new FileStream(filePathName, FileMode.CreateNew)) { fs.Write(theFile.FileAsByteArray, 0, theFile.FileAsByteArray.Length); } I've purposefully left out any mistake handling, only you lot should add some into this method. I'll leave that equally an exercise for yous to do. Let'due south move on and create an Angular project to upload files to this Web API.
Build an Angular Upload Project
Build an Angular project from within VS Code past opening the terminal window. Navigate to the folder you created at the beginning of this article. For case, I navigate to the folder D:\Samples\FileUploadSample. Enter the following Angular CLI command in the terminal window to create a new Angular application:
ng new FileUploadAngular Add together Spider web API Projection to Workspace
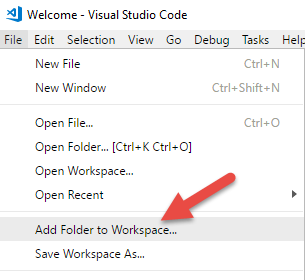
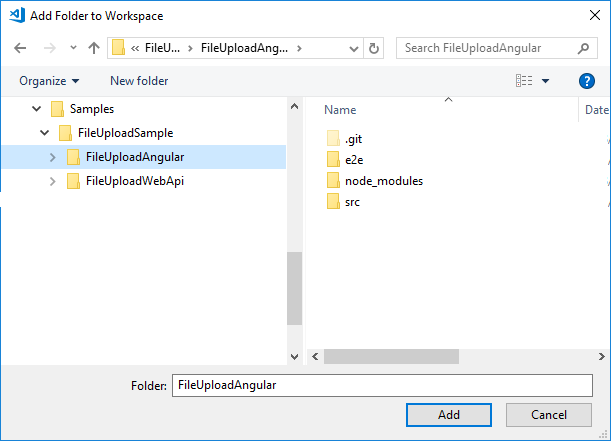
Once the project is created, add together the newly created folder named FileUploadAngular to VS Code. Select the File > Add together Folder to Workspace... menu item, as shown in Effigy four.
Choose the FileUploadAngular folder as shown in Figure five and click the Add push button.
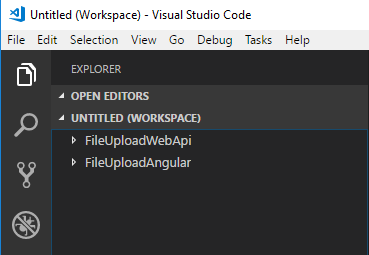
You should now see two projects within VS Code, equally shown in Effigy 6.
Salvage the Workspace
Click File > Salve Workspace As... and give it the proper noun FileUploadSampleApp. Click the Salvage button to shop this new workspace file on disk. From now on, you may ever open up this application by double-clicking on the FileUploadSampleApp.code-workspace file.
Create FileToUpload Class
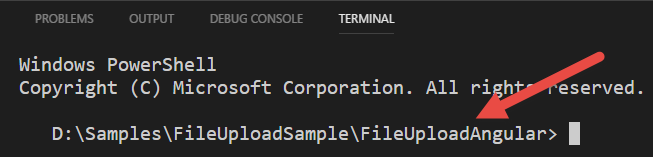
Just every bit you created a FileToUpload course in C# to hold the various attributes about a file, create the same grade in Angular. Go dorsum into the terminal window and navigate to the FileUploadAngular folder, every bit shown in Effigy vii.
Employ the Angular CLI control ng m cl to create a new form that represents a file to upload. You can create a folder named file-upload at the same time you create the FileToUpload class. The FileToUpload grade will be created in this new folder.
ng g cl file-upload/fileToUpload Open the newly generated file-to-upload.ts file and add the code shown next. Notice that this class has the aforementioned property names as the C# class you created earlier. Using the same belongings names allows yous to mail service this object to the Spider web API and the data independent in each matching belongings proper name is automatically mapped to the backdrop in the C# course.
export class FileToUpload { fileName: string = ""; fileSize: number = 0; fileType: string = ""; lastModifiedTime: number = 0; lastModifiedDate: Appointment = null; fileAsBase64: string = ""; } Create File Upload Service
As with whatsoever Angular application, dissever the logic that communicates with a Spider web API into an Angular service class. You lot tin can create a new service using the Athwart CLI command ng m due south. In the Integrated Terminal window, enter the following command to create a FileUploadService class:
ng g s file-upload/fileUpload -one thousand app.module Open the newly generated file-upload.service.ts file and add the import statements in the adjacent snippet. The HttpClient and HttpHeaders classes that are imported are used to send an HTTP request. The Observable class from the RxJS library is commonly used every bit a return value from service calls. The FileToUpload class is needed so you tin can laissez passer the data nigh the file to upload to the Web API.
import { HttpClient, HttpHeaders } from '@angular/common/http'; import { Appreciable } from 'rxjs'; import { FileToUpload } from './file-to-upload'; Add ii constants just below the import statements. The kickoff constant is the path to the FileUpload controller that you created earlier in this article. The second constant is a header used to post JSON data to the Web API.
const API_URL = "http://localhost:5000/api/FileUpload/"; const httpOptions = { headers: new HttpHeaders({ 'Content-Blazon': 'application/json' }) }; The HttpClient course needs to be injected into this service class to post the file data to the Web API method. Modify the constructor of the FileUploadService class to tell the Dependency Injection system of Angular to laissez passer in an instance of the HttpClient grade.
constructor(private http: HttpClient) { } Add together a method named uploadFile() to which y'all pass an case of the FileToUpload form. This class is built using properties from a File object retrieved from the user via an <input blazon="file"> element. Call the post() method on the HttpClient course passing in the URL where the controller is located, the file object to mail and the HTTP header constant.
uploadFile(theFile: FileToUpload) : Appreciable<whatever> { return this.http.mail service<FileToUpload>(API_URL, theFile, httpOptions); } File Upload Component
It'south now time to build the HTML page that prompts the user for a file from their local drive that they wish to upload to the Web server. Create an Angular component using the Athwart CLI control ng 1000 c. This command builds a .css, .html, and .ts file from which you build the file upload page. In the final window, enter the following command:
ng g c fileUpload Open up the file-upload.component.ts file and add 2 import statements for the FileUploadService and the FileToUpload class.
import { FileUploadService } from './file-upload.service'; import { FileToUpload } from './file-to-upload'; You should limit the maximum size of file that a user may endeavour to upload. The files are going to be Base64 encoded prior to sending. When you Base64-encode something, it grows larger than the original size. And then it'south best to limit the size of the file to upload. Add a constant just below the import statements and set a limit of one megabyte. Feel free to play with different file sizes to see what works with your situation.
// Maximum file size allowed to be uploaded = 1MB const MAX_SIZE: number = 1048576; You lot demand to add 2 public properties to FileUploadComponent class. The first property, theFile, holds an instance of a file object returned from the file upload object. At that place'due south no equivalent of the HTML file object in Angular, so you must utilise the any information type. The second property, messages, is used to display i or more letters to the user.
theFile: any = null; messages: string[] = []; The FileUploadComponent class creates an case of a FileToUpload form from the data contained in the theFile property. It then passes this object to the FileUploadService to upload the file to the server. Inject the FileUploadService into the constructor of the FileUploadComponent.
constructor(private uploadService: FileUploadService) { } Get File Information from Change Event
When the user selects a file from their file system, the change issue is fired on the file input element. Y'all're going to respond to this modify event and telephone call a method named onFileChange() in your component. Write this code equally shown here:
onFileChange(event) { this.theFile = null; if (event.target.files && event.target.files.length > 0) { // Don't let file sizes over 1MB if (issue.target.files[0].size < MAX_SIZE) { // Set up theFile holding this.theFile = event.target.files[0]; } else { // Display error message this.letters.push("File: " + event.target.files[0].name + " is besides large to upload."); } } } In the onFileChange() method an argument, named event, is passed in by the file input element. You check the target.files belongings of this statement to meet if the user selected a file. If a file is selected, check the size belongings to make certain it'southward less than the size yous placed into the MAX_SIZE constant. If the file meets the size requirement, yous retrieve the first chemical element in the files array and assign it to the theFile property. If the file exceeds the size requirement, push a bulletin onto the messages array to inform the user of the file name that'south in error.
Read and Upload File
Add a private method named readAndUploadFile() to the FileUploadComponent class as shown in Listing 2. Laissez passer the theFile belongings to this method. Although you could just access theFile belongings from this method, later in this article, you're going to need to pass a file object to this method to support multiple file uploads. Create a new instance of a FileToUpload class and set the backdrop from the file object retrieved from the file input element.
List 2: Read a file using the FileReader class
private readAndUploadFile(theFile: any) { let file = new FileToUpload(); // Set File Data file.fileName = theFile.proper name; file.fileSize = theFile.size; file.fileType = theFile.blazon; file.lastModifiedTime = theFile.lastModified; file.lastModifiedDate = theFile.lastModifiedDate; // Use FileReader() object to get file to upload // NOTE: FileReader only works with newer browsers let reader = new FileReader(); // Setup onload event for reader reader.onload = () => { // Store base64 encoded representation of file file.fileAsBase64 = reader.event.toString(); // Post to server this.uploadService.uploadFile(file).subscribe(resp => { this.messages.button("Upload complete"); }); } // Read the file reader.readAsDataURL(theFile); } Utilise the FileReader object from HTML five to read the file from disk into memory. Annotation that this FileReader object just works with modernistic browsers. Create a new instance of a FileReader class, and setup an onload() issue that'due south chosen afterwards the file has been loaded by the readAsDataUrl() method.
The readAsDataUrl() reads the contents and returns the contents every bit a Base64 encoded string. Within the onload() event, yous become the file contents in the event belongings of the reader. Place the contents into the fileAsBase64 holding of the FileToUpload object. Call the uploadFile() method on the FileUploadService grade, passing in this FileToUpload object. Upon successfully uploading the file, push the bulletin "Upload Consummate" onto the letters array to have information technology displayed to the user. The readAndUploadFile() method is called in response to the Upload File button's click event.
uploadFile(): void { this.readAndUploadFile(this.theFile); } The File Upload HTML
Open up the file-upload.component.html file and delete all of the HTML inside that file. Add the HTML shown in Listing 3 to create the page shown back in Figure 1. In the <input type="file" ...> element, y'all see that the change result is mapped to the onFileChange() method you wrote earlier. The Upload File push is disabled until the theFile property is not null. When this push is clicked on, the uploadFile() method is chosen to starting time the upload procedure.
List 3: Employ an input type of file to allow the user to select a file to upload
<h1>File Upload</h1> <label>Select a File (< 1MB)</characterization><br/> <input type="file" (change)="onFileChange($issue)" /><br/> <push (click)="uploadFile()" [disabled]="!theFile">Upload File</button><br/><br/> <!-- ** Brainstorm: Information MESSAGE Expanse ** --> <div *ngIf="messages.length > 0"> <span *ngFor="let msg of messages"> {{msg}} <br /> </span> </div> <!-- ** END: INFORMATION MESSAGE AREA ** --> After the input and button elements, you lot see another <div> element that's only displayed when in that location are messages within the letters assortment. Each message is displayed within a <span> element. These messages can brandish error or success messages to the user.
Modify App Module
Because you're using the HttpClient form in your FileUploadService class, you lot need to inform Angular of your intention to use this class. Open up the app.module.ts file and add a reference to the HttpClientModule to the imports property. Later typing the comma, and HttpClientModule, hit the Tab primal, or use the light bulb in VS Code, to add the appropriate import statement to the app.module.ts file.
imports: [BrowserModule, HttpClientModule], Change App Component HTML
The app.component.html file is the offset file displayed from the index.html page. Angular generates some default HTML into this file. Delete all the code within this file and add the lawmaking shown below to display your file upload component.
<app-file-upload></app-file-upload> Try it Out
Start the Web API project, if information technology'south non already running, by selecting Debug > Start Debugging from the VS Code menu. Open a terminal window in the FileUploadAngular binder and outset your Angular application using the Angular CLI command npm start, every bit shown in the side by side snippet:
npm start Open your browser and enter localhost:4200 into the address bar. You should come across a Web page that looks like Effigy ane. Click on the Choose File button and select a file that'south less than i megabyte in size. After you select a file, the proper noun of that file appears to the correct of this button, and the Upload File button becomes enabled. Click the Upload File button and after just a second or ii, an "Upload Complete" message should exist displayed. Check the folder where you specified to write the files and you should see the file proper name you selected followed by today's date. Open the file and ensure that all the file contents were written correctly.
Upload Multiple Files
The HTML file input type can upload multiple files past calculation the multiple attribute to the input element. Each file to upload must be under ane megabyte in size, simply you may select every bit many files as you lot wish. Open the file-upload.component.html file and modify the HTML shown in assuming below:
<label>Select a File(southward) (< 1MB)</label><br/> <input type="file" (alter)="onFileChange($event)" multiple="multiple" /><br/> <button (click)="uploadFile()" [disabled]="!theFiles.length">Upload {{theFiles.length}} File(s)</push button> Open the file-upload.component.ts file and locate the following line of code:
theFile: any = null; Modify this from a single object to an array of file objects.
theFiles: any[] = []; Alter the onFileChange() method then it looks like Listing 4. Finally, alter the uploadFile() method to loop through the list of file objects selected. Each time through the loop, laissez passer the electric current instance of the file object retrieved from the file input blazon to the readAndUploadFile() method. You lot now empathize why information technology was important for you to pass a file object to the readAndUploadFile() method.
uploadFile(): void { for (let alphabetize = 0; alphabetize < this.theFiles.length; index++) { this.readAndUploadFile(this.theFiles[index]); } } Listing 4: Modify the onFileChange() method to support multiple files
onFileChange(event) { this.theFiles = []; // Whatever file(s) selected from the input? if (outcome.target.files && event.target.files.length > 0) { for (let index = 0; index < issue.target.files.length; index++) { let file = issue.target.files[index]; // Don't let file sizes over 1MB if (file.size < MAX_SIZE) { // Add file to list of files this.theFiles.push(file); } else { this.messages.button("File: " + file.proper name + " is too large to upload."); } } } } Effort it Out
Save all your changes. Go back to the browser and you may at present select multiple files. Select a few files, click the Upload Files button and ensure that all files are uploaded to the appropriate folder.
Summary
In this commodity, you learned to upload small files from your client Web application to a server using Angular and a .NET Core Web API project. On the server-side, you need to make sure that you enable CORS to laissez passer data from one domain to another. On the client-side, you're using the FileReader form to read information from the user's file system. The technique illustrated in this article should only be used for small files, every bit information technology would accept too long to read a large file from disk, and also long to ship to the server. During this time, you tin't provide feedback to the user and you won't be able to display a percentage uploaded. At that place are several skillful open-source libraries for uploading large files to the server that do provide feedback as the upload process is happening.
Source: https://www.codemag.com/Article/1901061/Upload-Small-Files-to-a-Web-API-Using-Angular
0 Response to "Angular Upload File to Api Byte Array"
Post a Comment